dinsdag 30 augustus 2011

Sazabi WIP 8


Airbrush...handpaint...airbrush... topcoat.....airbrush...handpaint...and airbruhzzz .....zzzzz  zzzz
Okay here some piczz..zzzz


Now the really hard part almost finished painting all the parts of the base. It's time to wire this fellow..
Studied the electric diagram for a while and it looks pretty simple because every thing is numbered and colored.So it shouldn't be that difficult.The thing that I'm most concerned about is how to fit all the wires in the model.


Okay let get started...got myself a new soldering iron for this model.
(Btw I have never build a gundammodel with so many electric parts so finger crossed)


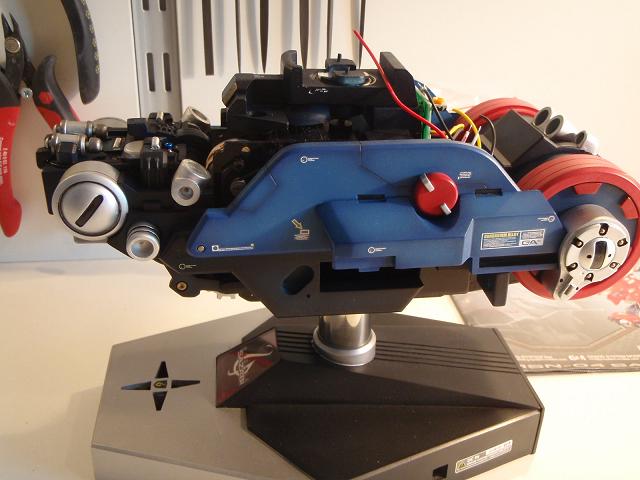
 At this moment I was really worried if it will fit together...


 When soldering i proteced the model with aluminiumfoil. Just in case...

 After one hour of soldering I finally got it ready

 And yes it fits!!!...but will it work..can't answer that yet....


 And some details!

Sazabi WIP 7

When airbrushing I tried a technique I'd never used before. The plan was for a even color,but soon I realize that it wouldn't work out for this beast... So I decided to post-shaded/pre-shaded (tried both) all the parts. And i think it turns out pretty good (for my standards)


 Also top-coated and did all the decals on the parts


Sazabi WIP 6

Finally i got to the painting part finished the base and i'm pretty happy how it turns out

Here some pics...


 Now i can't start building!!!!


More to come....

Sazabi WIP 5

Still busy with the pistons.

Secured the balljoints with some putty (A). The balljoints of the cilinder wouldn't fit properly,so a glued a tiny bit of stryrene on it.(B)


 After some sanding got it fixed!(A)

 And some putty (A) again to lock it up...

 Finished!and ready for priming....

woensdag 24 augustus 2011

Sazabi WIP 4

This kit comes with serval metal parts inculding some pistons for the neck.
Straight out of the box the parts aren't very shiny (B) as the should be (A).

But i learned a way to "polish" steal parts (A) (check the YT channel of sleepylafiel )

 Just take some really fine sandpaper and a eletric drill

Also did the other part 
 Some clean up and it looks much better!

Sazabi WIP 3

When building i discoverd a wrong mould. The parts should be symmetric
 So i had to mod it ! And made a cut (red line)
 After cutting the piece in half and some sanding,I replaced the removed resin with some styrene(A).To make it the same size again. Reinforced it with a brass rod (B)

 Glued it in place.Again some sanding and done!

Sazabi WIP

Time to fit the electric servo motors

The first motor is for opening the chest (blue) and the panels on the both sides,by moving back and forward. This motor only work in combination with the moving sensor (so won't work manually)

The second servo-motor (right on top of the first one) is for turning the hed left and right. There's one pin (A) that move sideways,the center of the neckjoint (B) lies behind the servo itself. The blue part connect both pins. 

Everything seems perfect alligned
So i secured the two servo-motors with it's "neckbase" locked up by pinning the sides.


Next small problem the right side panel (pic) didn't fit properly (red arrows) because of the servomotor.There was only one way to install the motor so i couldn't move it either.

Found out i had to cut just a little piece off the servo to make the panel fit. Nothing special

dinsdag 23 augustus 2011

WIP Sazabi (build 1)

Started to build and not all parts fit right and had to make some adjustments

for example:

The blue surrounded part would fit because it was to small, so to fit i had to cut it in half (A)


To extend the part i used some styrene (B) and reinforced it with some putty (A) on top of that i will glue another styrene plate


perfect fit...only some sanding left to do


Another small fit problem but very easy to solve!

This parts would't allign with it's base (red lines)


But found the source of the problem! Just had to sand and cut some resin almost to easy!

There's a small gap left but nothing to worrie about because most of this panel will be covered up by another panel.